tags:
Contents
Overview
Virtualization makes it easy to add more disk capacity to a virtual machine. Extending a virtual disk in VMware will grant the VM access to more storage, but we still have to make that storage usable to the operating system.
This post will explain the steps required to make this additional storage usable within a Linux virtual machine. These steps work with both CentOS7 and Ubuntu 16 and 17, and is done completely from the command line.
It is always best to use extreme caution when making changes to a production system. While these instructions will allow you to do this on a running system without rebooting, I would suggest using a maintenance window to perform this operation and I would not do this live on a mission critical system.
Under those circumstances I would suggest extending your volume by attaching the disk to another VM or booting from a Live CD and these instructions still apply.
That said there are many scenarios where the risk is acceptable. However, backup and verify important data before making any changes to a disk!
Before we begin we are assuming the following:
- CentOS7 or Ubuntu is being used.
- The disks are partitioned using the Linux Logical Volume Manager (LVM)
We will need to resize the disk on several “levels” before we are done.
The first level is the virtual disk itself (this is representative of a physical hard drive in a physical server). This step is performed using the virtualization manager, and isn’t covered here in detail. Level two is resizing the disk partition we will be using. Third is the physical volume. Fourth is the logical volume. Finally we resize the file system.
Step 1 - Verify the Disk Size in Linux
The first thing we need to do is make sure the operating system sees that the disk has been increased in size. The bus will be rescanned on a reboot, but what if we don’t want to reboot? To force the system to rescan a device run the following command. Note that this is disk specific. The command below will rescan /dev/sda (the first disk).
echo 1 > /sys/block/sda/device/rescan
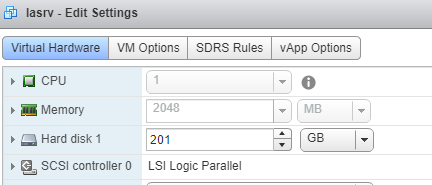
Here is an example where 1GB was added to a 200GB disk. Notice the Disk size after each fdisk command.
root@lasrv:~# fdisk -l
Disk /dev/sda: 200 GiB, 214748364800 bytes, 419430400 sectors
Units: sectors of 1 * 512 = 512 bytes
Sector size (logical/physical): 512 bytes / 512 bytes
I/O size (minimum/optimal): 512 bytes / 512 bytes
Disklabel type: dos
Disk identifier: 0x4756842e

Device     Boot     Start       End   Sectors  Size Id Type
/dev/sda1  *         2048 415236095 415234048  198G 83 Linux
/dev/sda2       415238142 419428351   4190210    2G  5 Extended
/dev/sda5       415238144 419428351   4190208    2G 82 Linux swap / Solaris

root@lasrv:~# echo 1 > /sys/block/sda/dev/rescan

root@lasrv:~# fdisk -l
Disk /dev/sda: 201 GiB, 215822106624 bytes, 421527552 sectors
Units: sectors of 1 * 512 = 512 bytes
Sector size (logical/physical): 512 bytes / 512 bytes
I/O size (minimum/optimal): 512 bytes / 512 bytes
Disklabel type: dos
Disk identifier: 0x4756842e

Device     Boot     Start       End   Sectors  Size Id Type
/dev/sda1  *         2048 415236095 415234048  198G 83 Linux
/dev/sda2       415238142 419428351   4190210    2G  5 Extended
/dev/sda5       415238144 419428351   4190208    2G 82 Linux swap / Solaris
The size shown by fdisk should match the size shown in your virtualization software. Once you’ve verified this move on to step 2.
Step 2 - Resizing the Partition
With the OS seeing the underlying disk size correctly we can proceed to resize the physical disk partition. This is done using fdisk and requires that we delete the existing partition and create a new, larger, partition in its place.
Although this may sound scary, it is not. No data should be lost, and you have your system backed up, right? RIGHT?
Here is our starting point. Notice the size of our disk /dev/mapper/centos-root is 11.5GB.
[root@localhost ~]# fdisk -l

Disk /dev/sda: 14.0 GB, 13958643712 bytes, 27262976 sectors
Units = sectors of 1 * 512 = 512 bytes
Sector size (logical/physical): 512 bytes / 512 bytes
I/O size (minimum/optimal): 512 bytes / 512 bytes
Disk label type: dos
Disk identifier: 0x000912b7

   Device Boot      Start         End      Blocks   Id  System
/dev/sda1   *        2048     1026047      512000   83  Linux
/dev/sda2         1026048    25165823    12069888   8e  Linux LVM

Disk /dev/mapper/centos-root: 11.5 GB, 11496587264 bytes, 22454272 sectors
Units = sectors of 1 * 512 = 512 bytes
Sector size (logical/physical): 512 bytes / 512 bytes
I/O size (minimum/optimal): 512 bytes / 512 bytes


Disk /dev/mapper/centos-swap: 859 MB, 859832320 bytes, 1679360 sectors
Units = sectors of 1 * 512 = 512 bytes
Sector size (logical/physical): 512 bytes / 512 bytes
I/O size (minimum/optimal): 512 bytes / 512 bytes
Now we are going to use fdisk to delete the existing partition and create a new, larger, partition to replace it. Be sure to know whether the partition is Primary or Extended, the partition number, and the partition type. In the example below, we are working on a Primary partition and it’s is partition number 2. Linux LVM partitions are type 8e.
Be sure to change the type to 8e before writing the changes to disk. I am assuming you have some experience using fdisk, but the console log below goes through every step required. For more information the fdisk man page is a good place to start.
[root@localhost ~]# fdisk /dev/sda
Welcome to fdisk (util-linux 2.23.2).

Changes will remain in memory only, until you decide to write them.
Be careful before using the write command.


Command (m for help): d
Partition number (1,2, default 2):
Partition 2 is deleted

Command (m for help): n
Partition type:
   p   primary (1 primary, 0 extended, 3 free)
   e   extended
Select (default p):
Using default response p
Partition number (2-4, default 2):
First sector (1026048-27262975, default 1026048):
Using default value 1026048
Last sector, +sectors or +size{K,M,G} (1026048-27262975, default 27262975):
Using default value 27262975
Partition 2 of type Linux and of size 12.5 GiB is set

Command (m for help): t
Partition number (1,2, default 2): 8e
Partition number (1,2, default 2):
Hex code (type L to list all codes): 8e
Changed type of partition 'Linux' to 'Linux LVM'

Command (m for help): p

Disk /dev/sda: 14.0 GB, 13958643712 bytes, 27262976 sectors
Units = sectors of 1 * 512 = 512 bytes
Sector size (logical/physical): 512 bytes / 512 bytes
I/O size (minimum/optimal): 512 bytes / 512 bytes
Disk label type: dos
Disk identifier: 0x000912b7

   Device Boot      Start         End      Blocks   Id  System
/dev/sda1   *        2048     1026047      512000   83  Linux
/dev/sda2         1026048    27262975    13118464   8e  Linux LVM

Command (m for help): w
The partition table has been altered!

Calling ioctl() to re-read partition table.

WARNING: Re-reading the partition table failed with error 16: Device or resource busy.
The kernel still uses the old table. The new table will be used at
the next reboot or after you run partprobe(8) or kpartx(8)
Syncing disks.
We are almost done. We will need to tell the kernel to rescan the partition and use it’s new size. Although the suggested command above is partprobe this cannot be run (on CentOS7) on a partition that is in use. We will use the command partx instead.
[root@localhost ~]# partx -u /dev/sda
Now when we run fdisk again you will see that the block size has changed for the partition we re-created. In this case it went from 12069888 blocks to 13118464 blocks.
Step 3 - Resizing the Physical Volume
If we weren’t using LVM we could now resize the filesystem and be done. But, we are using LVM so we need to run some additional commands to use the new disk space.
The first thing we need to do is resize the physical volume. We can view the size of the physical volumes using the command pvdisplay.
[root@localhost ~]# pvdisplay
  --- Physical volume ---
  PV Name               /dev/sda2
  VG Name               centos
  PV Size               <11.51 GiB / not usable 2.00 MiB
  Allocatable           yes (but full)
  PE Size               4.00 MiB
  Total PE              2946
  Free PE               0
  Allocated PE          2946
  PV UUID               XepyHg-H23c-Qkma-2sDl-f5if-diC8-f7Gsn7
Note the PV Name /dev/sda2 and PV Size 11.51Gib above. Afer resizing the physical volume this will increase. To resize the physical volume we’ll use the pvresize command.
[root@localhost ~]# pvresize /dev/sda2
  Physical volume "/dev/sda2" changed
  1 physical volume(s) resized / 0 physical volume(s) not resized
Now we’ll run pvdisplay again and see the new size.
[root@localhost ~]# pvdisplay
  --- Physical volume ---
  PV Name               /dev/sda2
  VG Name               centos
  PV Size               <12.51 GiB / not usable 2.00 MiB
  Allocatable           yes
  PE Size               4.00 MiB
  Total PE              3202
  Free PE               256
  Allocated PE          2946
  PV UUID               XepyHg-H23c-Qkma-2sDl-f5if-diC8-f7Gsn7
The PV Size now reads 12.51Gib and we can move on to resizing the logical volume.
Step 4 - Resizing the Logical Volume
Let’s take a look at the size of the logical volume using the lvdisplay command.
[root@localhost ~]# lvdisplay
  --- Logical volume ---
  LV Path                /dev/centos/root
  LV Name                root
  VG Name                centos
  LV UUID                2j5NcR-5Uec-PPd3-z34J-ON18-k3d5-g2OuDw
  LV Write Access        read/write
  LV Creation host, time localhost, 2017-12-12 11:46:22 -0500
  LV Status              available
  # open                 1
  LV Size                <10.71 GiB
  Current LE             2741
  Segments               1
  Allocation             inherit
  Read ahead sectors     auto
  - currently set to     8192
  Block device           253:0
This command will list all logical volumes on the system. In this case we are working with the root volume. Make sure you are looking at the correct volume. The two important pieces of information displayed are LV Path and LV Size. We can see above the size is listed as 10.71Gib.
Let’s extend the logical volume.
[root@localhost ~]# lvextend -l +100%FREE /dev/centos/root
  Size of logical volume centos/root changed from <10.71 GiB (2741 extents) to <11.71 GiB (2997 extents).
  Logical volume centos/root successfully resized.
This command may need a bit of additional explanation. The switch -l tells the command we are specifying disk extents. We are telling the command to add all free extents by using +100%FREE.
You can see in the output that the volume was extended from 10.71Gib to 11.71Gib. We can verify this using the lvdisplay command again.
[root@localhost ~]# lvdisplay
  --- Logical volume ---
  LV Path                /dev/centos/root
  LV Name                root
  VG Name                centos
  LV UUID                2j5NcR-5Uec-PPd3-z34J-ON18-k3d5-g2OuDw
  LV Write Access        read/write
  LV Creation host, time localhost, 2017-12-12 11:46:22 -0500
  LV Status              available
  # open                 1
  LV Size                <11.71 GiB
  Current LE             2997
  Segments               1
  Allocation             inherit
  Read ahead sectors     auto
  - currently set to     8192
  Block device           253:0
Now we can proceed to the final step.
Step 5 - Growing the Filesystem
The commands used for this step will differ depending on the filesystem in use. By default CentOS7 uses XFS, and Ubuntu user EXT4.
First let’s see what size the OS sees using df -h.
[root@localhost ~]# df -h
Filesystem               Size  Used Avail Use% Mounted on
/dev/mapper/centos-root   11G  1.1G  9.7G  11% /
devtmpfs                 486M     0  486M   0% /dev
tmpfs                    497M     0  497M   0% /dev/shm
tmpfs                    497M  6.6M  490M   2% /run
tmpfs                    497M     0  497M   0% /sys/fs/cgroup
/dev/sda1                497M  151M  347M  31% /boot
tmpfs                    100M     0  100M   0% /run/user/0
Notice that /dev/mapper/centos-root is 11G. Let’s extend this filesystem.
The command on CentOS7 (XFS):
[root@localhost ~]# xfs_growfs /dev/mapper/centos-root
meta-data=/dev/mapper/centos-root isize=256    agcount=7, agsize=436992 blks
         =                       sectsz=512   attr=2, projid32bit=1
         =                       crc=0        finobt=0 spinodes=0
data     =                       bsize=4096   blocks=2806784, imaxpct=25
         =                       sunit=0      swidth=0 blks
naming   =version 2              bsize=4096   ascii-ci=0 ftype=0
log      =internal               bsize=4096   blocks=2560, version=2
         =                       sectsz=512   sunit=0 blks, lazy-count=1
realtime =none                   extsz=4096   blocks=0, rtextents=0
data blocks changed from 2806784 to 3068928
The command on Ubuntu (EXT4):
root@ubuntu:~# resize2fs /dev/ubuntu-vg/root
resize2fs 1.43.5 (04-Aug-2017)
Filesystem at /dev/ubuntu-vg/root is mounted on /; on-line resizing required
old_desc_blocks = 2, new_desc_blocks = 2
The filesystem on /dev/ubuntu-vg/root is now 2883584 (4k) blocks long.
Notice the filesystem paths are different between CentOS7 and Ubuntu. You can use the filesystem path displayed in the df -h command.
Let’s verify our CentOS system shows the additional size for the root volume by running df -h again.
[root@localhost ~]# df -h
Filesystem               Size  Used Avail Use% Mounted on
/dev/mapper/centos-root   12G  1.1G   11G  10% /
devtmpfs                 486M     0  486M   0% /dev
tmpfs                    497M     0  497M   0% /dev/shm
tmpfs                    497M  6.6M  490M   2% /run
tmpfs                    497M     0  497M   0% /sys/fs/cgroup
/dev/sda1                497M  151M  347M  31% /boot
tmpfs                    100M     0  100M   0% /run/user/0
Our work is done. We now have the additional disk space available to use within the OS. Not quite as simple as point and click, but this would be easily scriptable.
Conclusion
What we just did was walk through the steps required to make additional disk space available within the Linux OS after extending a virtual disk in VMware (or any other hypervisor).
Again, I would not do this without having a verified backup of important data. I also would not recommend doing this live unless you don’t have any other choice or it’s a system that is not critical and easily restored.