tags:
Contents
Rust Programming & ST Nucleo-F302R8
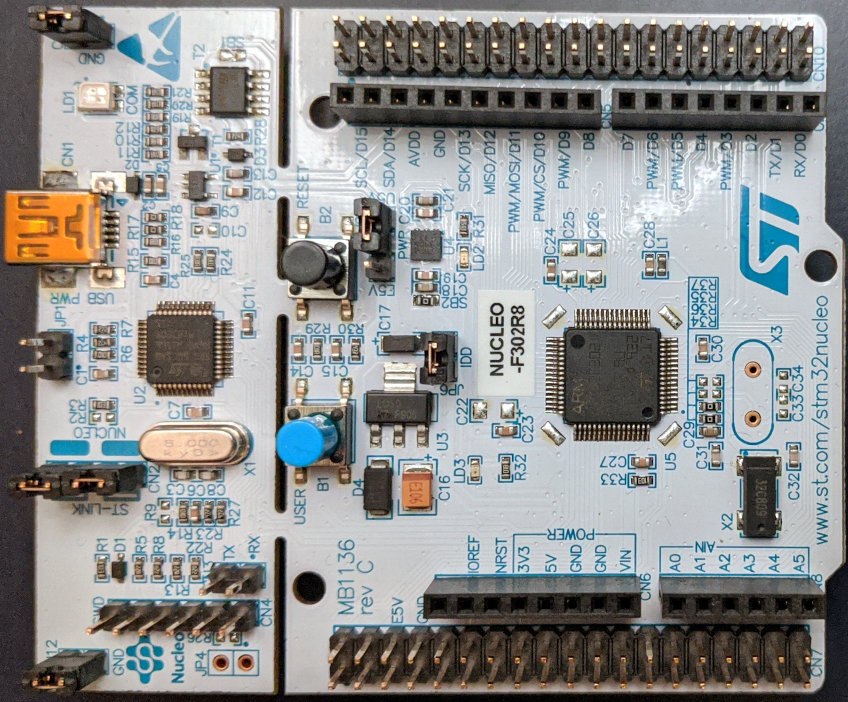
STM32 Nucleo-F302R8 development board with STM32F302R8 MCU
Introduction
I’m new to rust and new to embedded programming. I wanted to document my experience getting started. This started when I bought an Arduino kit to do some projects with my family while we’re stuck inside avoiding the pandemic.
If you notice any incorrect information or ways to improve what I’ve done here I would greatly appreciate the feedback!
During this time I also started learning the rust programming language. Rust can be used for embedded programming, but unfortunately the Arduino Uno that I had wasn’t really supported as a compilation target from rust. This compatibility issue stems from the AVR microcontroller used on the Uno.
More information on using Rust with an Uno can be found here and here. Good luck!
In the end I decided to purchase a new, and cheap, STM32 based board with good support from the Rust embedded community. The common recommendations I found online were that STM32DISCOVERY and the Blue (or newer Black) Pill. Unfortuantely, both of those were out of stock everywhere I checked (or marked up considerably).
Luckily, I found, this blog post that went through someone’s introductory experience with an STM32F411 board. However, that was also out of stock at the retails I checked. I ended up with something similar, just without all that extra ram and flash storage. :)
The Hardware
First, I’ll detail the hardware I purchased. I found a ST model NUCLEO-F302R8 in stock and for the bargain basement price of $10.32 at Digi-Key. With tax and shipping it set me back a total of $17.92.
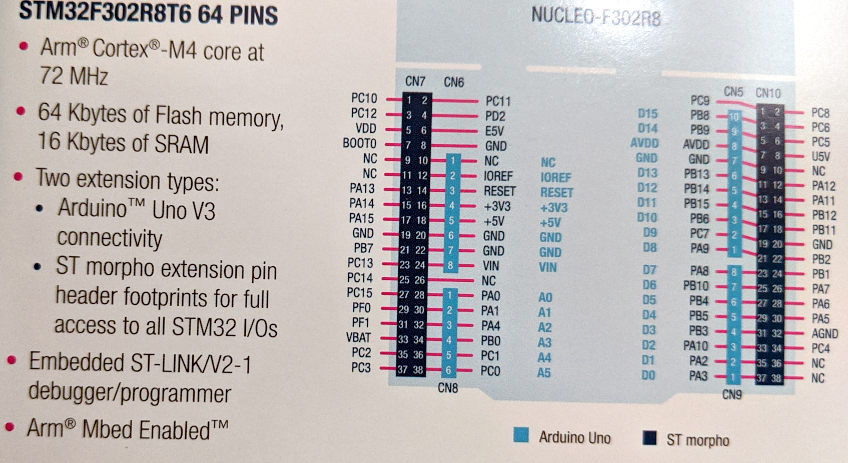
This fancy board features an STM32F302R8 microcontroller with an FPU so look out advent of code!
We will be storing this code on 64Kb of flash memory and using 16Kb of SRAM!
It also supports Arduino Uno extension, although I’m not user yet how that works. It also supports ST morpho extension – which, again, I’m not sure how that works.
Basically, I wanted to get started and found a cheap board that was in stock and here I go. I’m not sure if this will turn out to be a wise purchase or a waste of money, but I’m happy you’re along for the ride.
Online Resources
Before I get started I’d like list some of the helpful resources I’ve found online. There are many devices and seemingly few resources for getting started with them – especially in rust.
- The NUCLEO-F302R8 Product Page . Here you can find pdf manuals and software downloads (which I needed to setup my rust crate).
- The STEM32F302 Product Page. This page has all the technical references for the STEM32F302 microprocessor.
- This Brighton Rust blog entry. Here I also found some helpful hints. This page has some rust specific information.
- The Embedded Rust Book. Although I’ve had to piece together part specific information elsewhere, this is my primary source of guidance. There is information about setting up the tool chain and connecting to the board that is extremely helpful.
- My NUCLEO-F302R8 Quickstart Project
This can be used with
cargo generate --git https://github.com/larntz/cortex-m-quickstart-nucleo-f302r8.
I will continue to update this section as I find new links.
Requirements
Cable
The first thing that is required is connecting the board to a PC. This board requires a usb mini-b cable. Make sure yours has data transfer capabilities or you might end up staring at the tail end of dmesg wondering if your board is shy…
Software
I’m using Linux, and everything I do here will be using from that perspective. If you are using Windows or Mac you will have to get your development environment setup properly using other resources. Once it is setup all the code here should work just fine on this device.
I’ll briefly cover the main requirements. For help getting everything installed have a look at the rust embedded book’s toolchain section and the installation section. It provides great instructions on getting your toolchain configured on the big 3 operating systems.
Rust
It must be obvious that you need rust installed on the computer you’re going to use
for programming the device. Make sure to install the target thumbv7em-none-eabihf
or you won’t be able to cross compile your code. 😮
I wouldn’t bother with the qemu stuff unless you want to play pretend. Nothing I’ll post here will use it.
Debugging Software
Aside from the rust/cargo tools we’ll be using OpenOCD and the GNU debugger aka GDB.
Memory Addresses
You will need to know what the memory region addresses are. This info is available in the microprocessor reference PDFs and included below.
FLASH : ORIGIN = 0x8000000, LENGTH = 64K
RAM : ORIGIN = 0x20000000, LENGTH = 16K
If these values aren’t set properly you won’t be able to load your software
into the board’s flash. Don’t ask me how I know, but you might see something
similar to this when you run the load command in gdb:
(gdb) load
Loading section .vector_table, size 0x400 lma 0x0
Loading section .text, size 0xfa0 lma 0x400
Load failed
Compilation Target
Next you will need to know the build target. For this MCU you will use
thumbv7em-none-eabihf. You can set this in [build section of the
project’s .cargo/config file.
[build]
# Pick ONE of these compilation targets
# target = "thumbv6m-none-eabi"    # Cortex-M0 and Cortex-M0+
# target = "thumbv7m-none-eabi"    # Cortex-M3
# target = "thumbv7em-none-eabi"   # Cortex-M4 and Cortex-M7 (no FPU)
target = "thumbv7em-none-eabihf"   # Cortex-M4F and Cortex-M7F (with FPU)
Connect to the Board
Next you need to be able to connect to your board. Follow the instructions in the rust embedded book to get connected.
You can use a template I created that already has the correct memory settings for
these boards if you’d like. Substitute their cargo generate command with this
one:
$ cargo generate --git https://github.com/larntz/cortex-m-quickstart-nucleo-f302r8
Now you’re ready to build something and load it on the device!
Programming
The process basically works like this.
- Write your application and
cargo buildit. - Connect to the onboard debugger with OpenOCD.
- Use DGB to load the program and run it.
Once the program is written to flash it will automatically run every time the board is powered on. So you load a fancy Morse Code blinking application and load it it’ll be there ready to run again next time you plug it in.
If you clone my nucleo-f302r8 example repo you’ll have a few programs to work from. Since this a getting started post I’ll go through the steps to build and load the blinkin-nucleo-fs302r8 program and expand on it in future posts.
Compile, Load, Continue
- Build the application with
cargo build. Your binary should end up the foldertarget/thumbv7em-none-eabihf/debug/blinkin. - In another terminal run
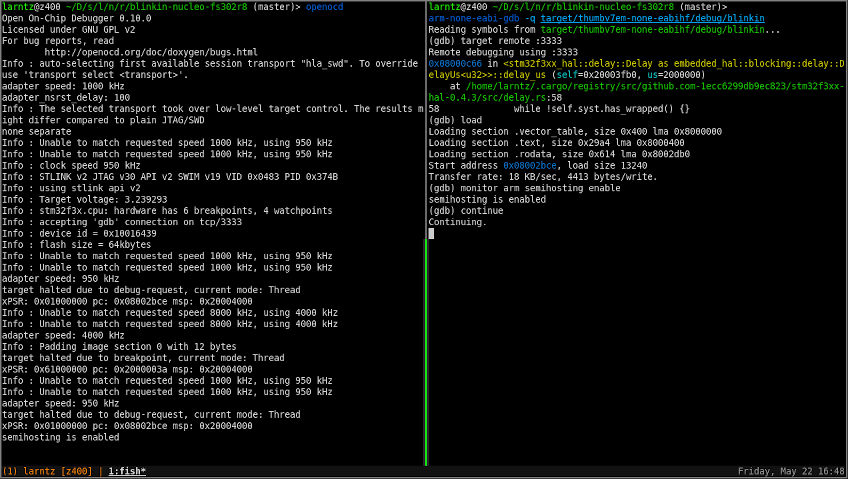
openocd. - Now, back in the original terminal, run
arm-none-eabi-gdb -q target/thumbv7em-none-eabihf/debug/blinkin.
- Once gdp is open connect to openocd with this command:
target remote :3333. - Once connected we’ll load the binary with the command:
load. - Often we would run
monitor arm semihosting enableso we can see debugging output, but blinkin doesn’t do output so we don’t need to enable it. - When your enter the
continuecommand the board will start the application. You should see your onboard led blinking on and off every second.
Conclusion
There’s a lot going on in this post. Getting started programming embedded devices is completely differen than regular programming. There are a lot of registers and cryptically named peripherals and hal crates that don’t quite match.
Good luck on your embedded rust journey!